Introduction.
Research for the Products pages began in 2016, and they were last updated in April 2025. If you are aware of any errors, or would like to add further details or personal memories, please email david@newall.org.uk.
We are indebted to former Commissioning Engineer, Tom Skop, for filling in many of the gaps in our knowledge of crankshaft and camshaft grinding operations, and also for adding some welcome information on the Vertex machining centres.
Important Note. Please be aware that we are unable to provide Service Manuals, Operating Instructions, Assembly Drawings or Electrical/Hydraulic/Pneumatic Schematics for any of the machines and instruments manufactured by the Newall Group; we simply do not have access to them. We are unable to help with the repair, refurbishment or operation of any of the products. All the data that we hold is available for free download from the “References” pages that can be found within the relevant sections on the Companies/Divisions tab.
Overview.
As the Newall Group developed and expanded, its product portfolio grew quite quickly. We have already seen (in the Brief History section) that some of the earliest offerings were simple gauges and micrometers, but once Mr. Sydney Player acquired the company it soon moved into the manufacture of machine tools, which became the company’s principal and best-known products.
As the group expanded, so the range of products also embraced different technologies because some companies that joined or became involved with the group had been applying their development expertise to a variety of machining processes. We can think, for example, of creep-feed grinding, spark-erosion, abrasive belt machining and high speed cylindrical grinding as technologies within the group that each required significant development and experimentation in different areas.
It is no simple matter to categorise and list the entire product range, and indeed, we have decided not to do so as many of the standard products are described in the various sales brochures and other documents. Many of these can be found and downloaded from the Newall Engineering References page on this website. We will therefore try to concentrate on the more interesting or less well-known products in these descriptions. Some products that have been traditionally associated with other companies before they became part of the group might not generally be regarded as Newall products. For example, steel mill roll grinders are still thought of as Churchill products, even though the last few were built by Newall. Even some well-known Newall products were manufactured elsewhere within the group (for example, the world-famous Newall Measuring Machines were actually produced in Maidenhead by the OMT division). In other cases, equipment was assembled from parts manufactured in more than one part of the group (e.g. the Newall Movie Cameras were partly machined in the Newall Engineering factory but final assembly was carried out by OMT). And, of course, Newall Precision Foundries in Bury supplied raw castings to many of the companies/divisions within the group.
Nevertheless, despite some inevitable overlap and omissions, the product portfolio can be divided into the following main categories, listed together with the main producers:
- Gauging, measurement and inspection – OMT
- Tooling – Newtool, OMT
- Drilling and boring – Newall, Butler
- Milling – Butler
- Grinding/abrasive machining – Newall, Churchill, Snow, Keighley
- Electrical Discharge Machining – Newall
For more information on these products, visit the company’s individual ‘Products’ pages on this website.
In November 1962, an article describing the activities of the Newall Engineering Company in Peterborough was published in Machinery magazine and later released as a separate booklet. We have been able to make it available (as an 8MB download) here with the kind permission of Machinery, published by Findlay Media, a Mark Allen Group company – https://www.machinery.co.uk
MOVIE CAMERA 1946.
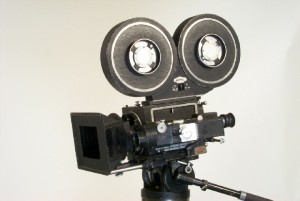
Let’s deal with this product first as it doesn’t fit into any of the above categories. This was an unusual product for the company and it was manufactured in partnership with OMT, who were ideally placed to produce the optics for it.
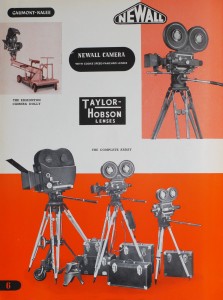
An article in the Reading Mercury dated August 3rd 1968 (download available here) implies that the entire camera project was handled exclusively by OMT, but we know this to be inaccurate because we have confirmation from an ex-Newall employee who was working in the Peterborough factory at the time, that a separate department was set up there, dedicated to this project. The product was known as the Newall camera, rather than the OMT camera, so we have brought together all the information we have about this product here, in the Newall part of our website.
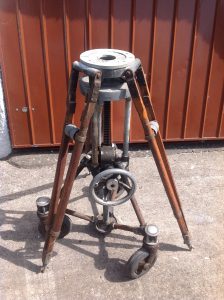
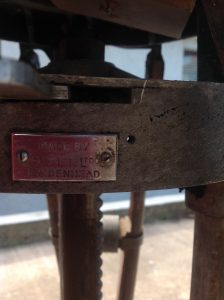
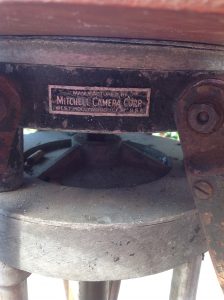
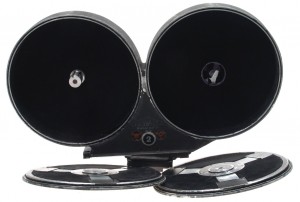
Nevertheless, we have eye-witness accounts from ex-OMT employees that final assembly of at least some of the cameras was carried out at the OMT factory in Maidenhead and we have seen what we believe to be a complete set of the camera manufacturing drawings preserved on microfilm in the OMT archive. It was obviously a joint venture between the two sites and we received the following photos from Kim Bennett of a camera tripod that he owned which bears two manufacturer’s nameplates: Mitchell Camera Corporation and OMT, which muddies the waters even further!
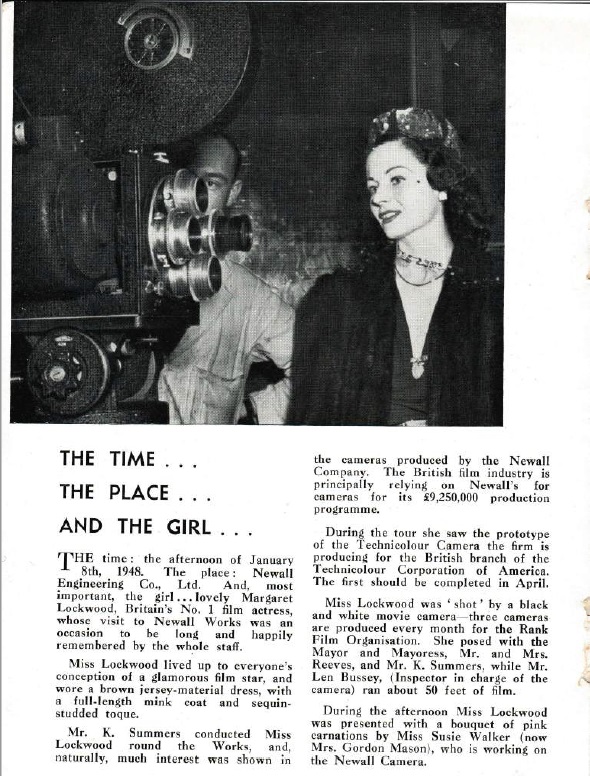
Circa 1946, (possibly in response to a decline in machine tool business), Newall started manufacturing movie cameras at the Old Fletton (Peterborough) site. We have been told that during this period, a visit was made to the Fletton High Street factory by Margaret Lockwood, a well known (and glamorous) actress of the time. The visit caused quite a stir! Here is a report of the visit taken from the Newall in-house magazine “Precision” No. 3 dated July 1948:
Click this thumbnail to download the entire magazine:
It seems that a separate section with three design draughtsmen was formed in the drawing office for the design work, and it was agreed that as this might be a short term arrangement, the individuals would be offered redundancy when the contract ended. In the event, two of the three opted to take the redundancy, and the third (Les Beales) was offered continued employment. We understand that production of cameras at Old Fletton ended after only 5 or 6 years, but ‘Newall NC’ cameras with serial numbers into the hundreds have been reported, and they were in use into the 70’s. [[This might suggest that production continued elsewhere?]] The afore-mentioned Reading Mercury article stated that 200 cameras costing up to £8,000 each were produced, so perhaps production was transferred from Peterborough to Maidenhead.
There is some confusion and argument over the precise nature of the contract that led to the development of the camera, although it is undisputed that the customer was the Rank Organisation. The film centre website declares that the cameras were produced under licence from Mitchell, who were unable to satisfy world demand. But a recent message from Ed Johnson, the director of mitchellcamera.com who gave us his understanding of the basis of the development as follows, suggests otherwise:
“The Newall came about because during WW2 J Arthur Rank could not reach a deal with the Mitchell Camera Company to buy their cameras with pounds sterling. During this time, they discovered that Mitchell had not patented their newest model – the NC in Great Britain. He jumped on that and contracted The Newall company to build an exact copy prototype. This was accomplished in 10 months. It took that long because even though Newall was famous for precision, the extreme precision of the film movement almost was beyond their capacity. In the process, they developed a different Magazine lock so as not to infringe another existing Mitchell Patent. OMT was commissioned to make the optical elements.” [[Ed was summarising from H. Mario Raimondo-Souto’s 2007 book “Motion Picture Photography: a history 1891 – 1960”]]
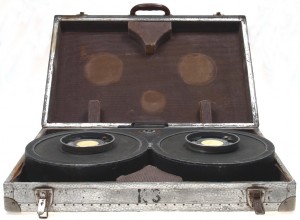
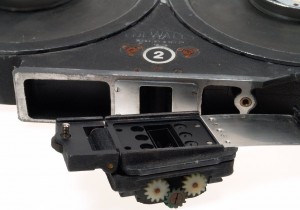
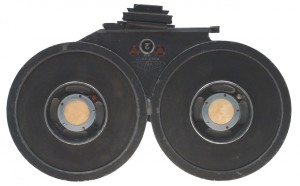
The following information has been taken from the ‘film centre‘ website which provides pictures of the cameras (some of which are re-produced below), and a short clip of a Newall camera as it threads a film – see ‘camera threading clip‘:
“The age of Hollywood in the 1950’s was about to roll and a Mitchell BNC was still the camera of choice, but Mitchell were unable to satisfy world demand and for several years a copy was made under licence [[this may be incorrect]] by Newall Engineering Ltd. in Peterborough, England. The Newall NC’s were built with noticeably different looking film mags, that were both heavier and quieter than the American models, more suited to film sets than newsreel or military uses, they use an elegant quick release mechanism on the mag door, rather than the Mitchell screw action which sometimes needed a hammer to get it off.”
One of these cameras sold for £1300 at auction in London in 2017 and the associated auctioneer’s notes make interesting reading:
A Newall 35mm Motion Picture Movie Camera: black, serial no. N.N.C582, with Cooke Speed Panchro f/2 50mm lens, black, serial no. 405702, body, VG, appears to run and function correctly, lens, G-VG, some light cleaning marks to front element and light haze, together with an Astro-Berlin Pan-Tachar f/2.3 75mm lens, chrome, serial no. 13253, body, G, elements, F, cleaning/coating marks to front element and some internal fungus, complete with Newall magazine marked ‘Made by O.M.T Ltd, J737’, Mitchell directors finder model I-LA, serial no. 226 and two motor units, mounted on an unmarked wooden tripod, with pan head, most in maker’s cases.
Provenance: Former Property of Doug Milsome ASC – Cinematographer. “The Newall cameras were used on photographing 2nd unit 35mm background plates because of its rock steady registration movement and high speed ability for special effects photography up to speeds of 120fps. I used a Newall camera on Where Eagles Dare, featuring Richard Burton and Clint Eastwood, on the cable car high angle shots for d/g plates to later project onto a studio screen behind the real actors. I also used a converted Newall adapted to take Nikon lenses for certain scenes in Full Metal Jacket.”
Ron Goodman, who started work at OMT (at the Slough factory) in 1940 remembers some kind of cine film processing machine being worked on, although he believes it was still undergoing development when he left the firm in 1950. He said it was a free-standing unit, painted with a glossy black finish, that must have been about 42″ (1067mm) high, 36″ (914mm) long and 16″ (406mm deep) and contained many film sprockets, probably for 35mm film. He presumes it must have been associated in some way with the camera project, but at present we have no confirmation of its precise purpose.
Even after camera production ceased, it seems OMT were still involved with that industry to some extent. Quoting the same Reading Mercury article: “… developments in colour films demanded a special seven-faced prism, with the use of which one film could be used instead of the three needed by an earlier system. Not being able to get what they wanted from their own optical industry, U.S. film-makers came to Maidenhead with their specifications and OMT successfully met their demands.”
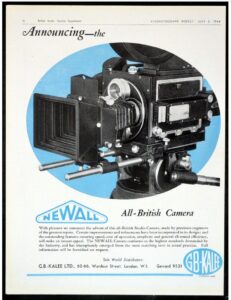
In March 2023, a very nice gentleman called Greg put up for sale on eBay an advertisement for the Newall camera from the June 6th 1946 edition of Kinematograph Weekly magazine. Greg has very kindly allowed us to reproduce the advertisement below. Click the image to enlarge:
BORING MACHINES
Jig Borers.
Newall Jig borers were (and probably still are) used all around the world wherever there was a requirement for very accurate boring of holes in a multitude of applications, but particularly for the production of jigs and fixtures as well as many aerospace components. The machines were known by the size of their work-tables and included the popular “1520” (table 15 x 20 inches) and “2030” at the smaller end, up to the “2443” and the mighty “2657” Spacematic.
They were available with several different measuring systems including a vernier drum and precision screw and a direct-reading OMT optical scale, as well as the famous Newall system of rollers. To measure the position of the table in the X and Y axes, this latter system relied on a row of very accurate one-inch diameter rollers in contact with one another, together with a micrometer head. The micrometer head was mounted on an inverted vee block that could be placed on any of the rollers. By choosing the appropriate roller in the line, the table could be moved an exact number of inches, and the micrometer head then used to measure the movement of the final part of an inch, to a typical accuracy of 0.0001″.
Digital readouts became a popular alternative measuring system, allowing simpler and quicker setting of the machine to a particular set of co-ordinates. The readout system most often supplied was the Digipac range. These systems were developed in-house, specifically for these machines, by Newall Electronics. The measuring transducer for these readouts was usually a linear diffraction grating manufactured by OMT, which gave the highest possible precision. The Digipac range was also available with Inductosyn scales or Newall’s own “Spherosyn” transducer. These were more rugged, if slightly less accurate, which made them more suitable to retro-fitting onto machine tools. (Further information on our Newall Electronics company pages). For jig borers, the highest possible accuracy was required, and since these are usually located in less hostile environments than most general purpose machine tools, diffraction gratings were favoured for these applications.
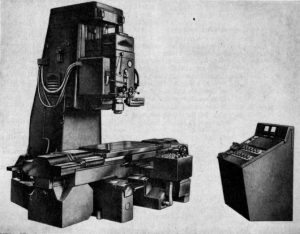
Some of the jig borers were available with automatic control systems. The Spacematic is probably the most famous, being the largest of the range and offering superb performance in terms both of its accurate table positioning and its high-precision spindle assembly.
It was fitted with a BTH (British Thomson Houston) control system using punched card data input, for which Newall themselves designed and produced a card stack reader, which took one card at a time from the pre-loaded stack for a given job. (Each card contained the data for one operation, i.e. one set of co-ordinates plus spindle actions). The measuring system in this case was magnetic, but similar in principle to the Newall roller system of the manual machines. Magnets were embedded in a fixed bar, spaced accurately at one-inch centres and “read” by a sensor head attached to the table. When commanded to move to a new position, the axis would move the appropriate number of magnets and settle with the reading head accurately aligned to the magnet. The sub-division of the final part of an inch was done by means of a high precision servo micrometer gearbox, off-setting the measuring system appropriately. BTH subsequently became AEI (Associated Electrical Industries), who continued to produce the control system for a while.
It is acknowledged that Newall’s international success and reputation for precision and quality depended upon a top-notch Inspection and Test facility. The opening of a brand new Metrology and Standards Room at the No. 1 factory in Peterborough was marked by the publication of an interesting little booklet entitled “Newall Precision – A Matter of Fact”. Towards the end of the leaflet is a photo of a set-up for checking the spacing of the magnets used in the Spacematic position feedback transducer.
A lower-cost control system was available from Airmec (later, Airmec-AEI) in the form of the Autoset N410. In April 2025, Didar Jittla contacted us with some photos that included a jig borer fitted with the N410 control system. Didar had only recently joined Plessey’s Ilford workforce when he was sent on a training course in 1970 to Newall. These are some of the photos he provided. In the first photo, Didar is on the right with David Graves (jig borer specialist) next to him, and Bert, the foreman from Plessey:
There is now a nice photo of the Airmec-AEI Autoset N410 control system:
Here, Didar is getting hands-on experience with the Newall 1520 machine…
… before settling down to prepare some machine sequences on punched paper tape using a Teletype terminal. Those were the days!
The N410 was a highly successful control system that was electro-mechanical in nature, rather than electronic, containing large numbers of relays and uni-selectors instead of transistors and counters to achieve a similar result.
It employed a sequential paper tape reader (reading one row of holes on the tape at a time) in contrast to the punched card reader of the BTH, or the block tape reader of the AEI Axiamatic, which was yet another alternative. This latter control system would read an entire block of punched holes sufficient for two co-ordinates plus any required preparatory “g” codes and miscellaneous “m” functions.
Some machines used the “Contimatic” control system from Ferranti or the “Plan-E-Trol” system (also known as “Numeritrol”) from AEI. These two control systems used magnetic tape as the data input medium, and also provided advanced contouring capability for precision milling operations, such as required in the manufacture of waveguides.
An article in the Journal of Electronics and Control (volume 15 issue 2) described a Newall 1520CC jig borer, automatically controlled in three dimensions by an AEI continuous numerical control system [[presumably “Plan-E-Trol”]] at Smiths Aviation Division in Basingstoke. It was producing aluminium alloy plates for the gearbox of the Smiths air data computer used in the de Havilland Trident aircraft. Components were consistently produced within a tolerance zone of 0.0002″. The machine was in use for sixteen and a half hours per day on a 2-shift basis.
In April 2020, we were contacted by John Plant (see our Feedback page), who worked with two Contimatic jig borers in the Toolroom at Rolls Royce in the 1960’s.
He speaks of the machines with great respect for their capabilities, although the noise from the hydraulic power packs made them unpopular with those who were used to working in the previously hushed environment of the jig boring section. John tells us that in the 1980’s the machines were returned to Peterborough for overhaul and to have the control systems changed for Allen Bradley CNC. He provided this photo taken during acceptance trials of one of them at Peterborough. John is the gentleman wearing the striped tie. Newall’s jig borer specialist, David Graves, is on the right.
The standard jig borer platform was also used as the basis of three other developments, namely a jig grinder, a vertical inspection machine and a spark erosion machine. These are described on subsequent pages but you can jump straight to them by clicking the links.
Fine Boring Machines.
Single and double-ended horizontal fine boring machines were manufactured with a particular view to producing components for the automotive industry. A brochure is available on the References page.
Drilling/Milling Machines.
Newall made a couple of forays into general purpose drilling/milling machines, which we would probably refer to as Machining Centres these days. The first came about through the ill-fated Newall-Burgmaster agreement in 1968 that saw American-designed turret-type drilling machines built in a factory in Croydon, for sale throughout Europe. The venture was never the success that had been hoped for and the factory was closed down after just 3 years, with the entire workforce being made redundant. Our research indicates that Burgmaster themselves were also in difficulty around this time, and the company subsequently collapsed. If anyone has photos or other details of the Newall-Burgmaster machines we would love to include them here.
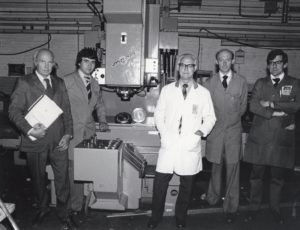
A second attempt to break into this market in the mid/late 70’s involved a Newall-designed machining centre called “Vertex 200”. It was conceived as an up-market drilling/milling machine and was available with an automatic tool-changer and carousel. The control system came from AEG and gave the machine an impressive 3-axis contouring capability. We have struggled to find any official photos of this product, but one was offered for sale in 2021 by Asset Disposal Services Ltd who provided the following photograph. This particular machine is not fitted with the automatic tool changer:
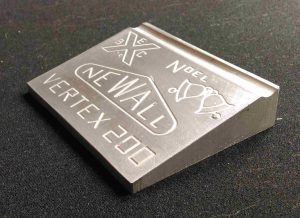
Here is a photo of a demonstration piece kindly loaned by Tom Skop, that was produced to show off its 3-axis capability in the run-up to Christmas 1979, presumably at a B. Elliott private exhibition event, BECX 79. The machining has been done on the inclined face of this wedge-shaped workpiece to emphasise the 3-axis performance.
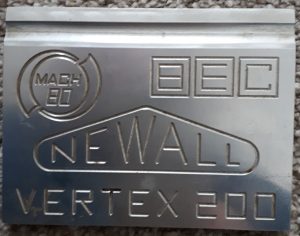
Sue Cartledge (formerly Sue Barrow) sent us a photo of a similar piece that was being machined for demonstration purposes at the 1980 Machine Tool Exhibition (MACH 80) in the National Exhibition Centre.
Uniquely, at that time, the CNC control system included an integrated PLC (Programmable Logic Controller) so it was an attractive package from Newall’s point of view as it removed the need for a separate PLC. Regrettably, the machine never fully realised its true potential. The control system suffered from reliability issues. Furthermore, the automatic tool-changer used a complex articulated arm to extract and insert tools into the chuck, and apart from being inherently slower than the more usual rotating transfer plate system (it first had to stow the current tool in the carousel and then wait for the carousel to deliver the required tool before the tool-change sequence could be completed), it also suffered mechanical problems. Some people felt that carrying the substantial weight of the carousel on the side of the column was not a good idea.
Only a handful of the machines were produced, with one going to Cambridge University in the engineering workshops, one to a tooling company in Tipton, in the West Midlands, and two went to China to support the Chinese aircraft industry. Allan Clarke and Dick Griffiths were two of the Newall staff who went out there to commission them and Allan contacted us (see Feedback page) to confirm that one was installed at a jet engine plant in Xian, and the other in a hydraulic and fuel systems plant in Nanjing. An internet search reveals that the Cambridge University machine was subsequently fitted with a Heidenhain TNC355 control system (it’s not clear if this was fitted by Newall) and had the following vital statistics:
- Table size 1000 mm x 500 mm
- Maximum travel in X 900 mm
- Maximum travel in Y 500 mm
- Maximum travel in Z 315 mm
- Spindle Power 20 HP

